
There are 2 ways to easily create a new online menu using Menubly.com
- Sign up to create a new online menu right away. This article is a step-by-step guide on how to do it, or watch the below tutorial video.
- Upload your paper menu or PDF menu and we’ll help convert it within 24 hours, for free. Contact us via live chat or whatsapp us if you need this.
Tutorial Video #
Create a new menu #
- Go to Sign up page
- Enter your Name, Email Address and Password
- Enter your Business Name and check if the Menu URL looks good. This URL will be the public URL for your menu, which you can share everywhere (for example: https://app.menubly.com/p/a-tu-bola)
- Sample categories and items will be added to your menu automatically. Don’t worry, you can change these later.
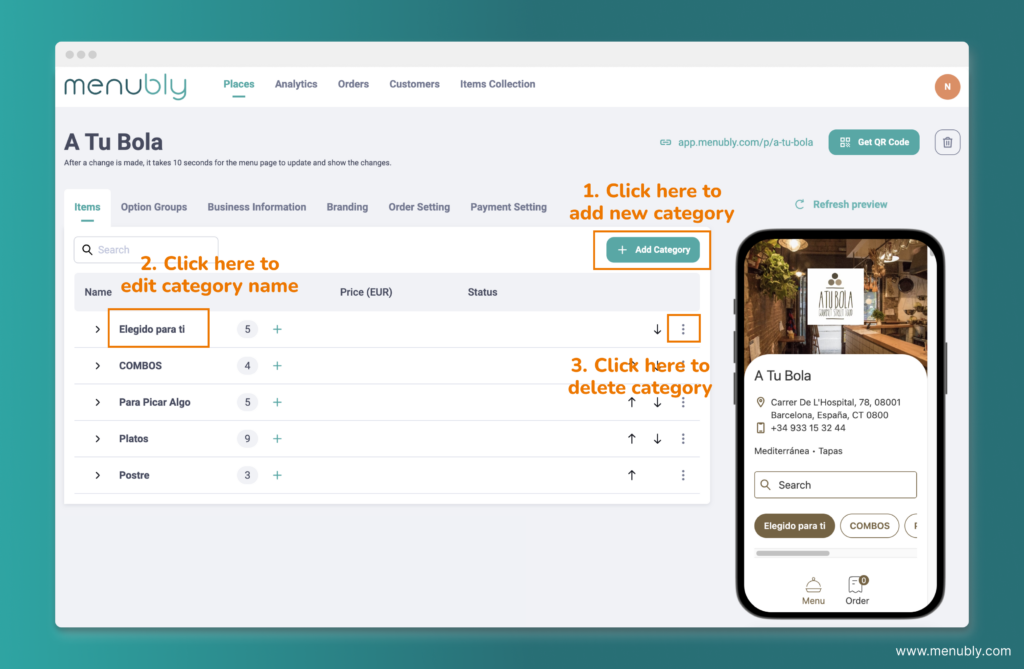
Add new categories #
Category is a group of items such as Appetizers, Mains, Drinks.
- Click on “Add Category” button to add new categories. You can add as many categories as you wish.
- Click on each category to change the name of the category
- To delete a category, simply click the three-dots icon on the right and then click “Delete“
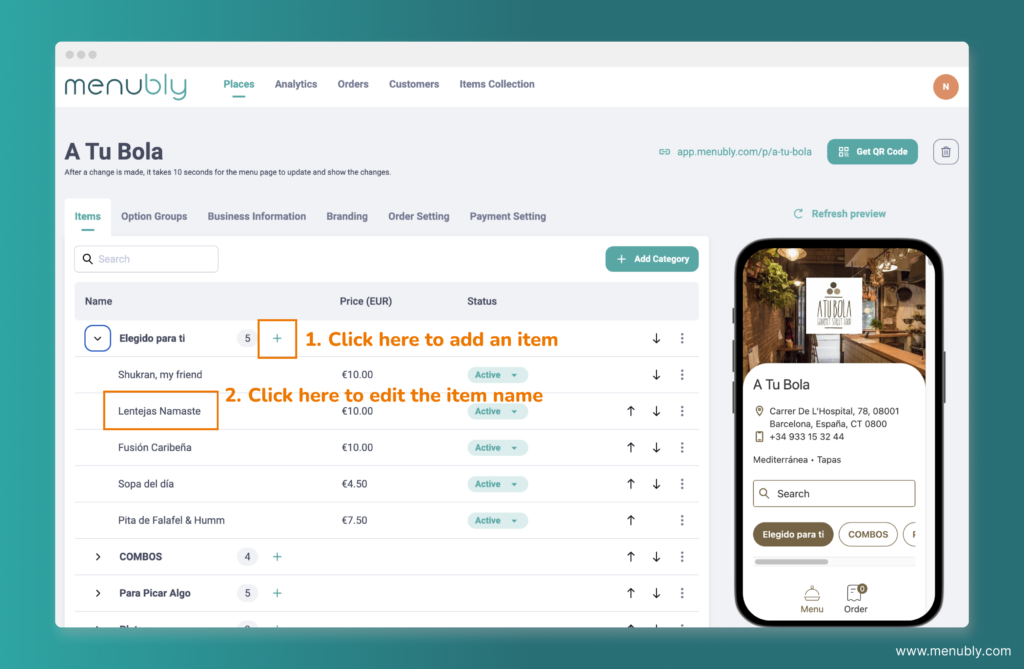
Add new items #
Item is a dish or specific food item such as burger, spaghetti, fries, etc.
- To add items to a category, click the “Plus” icon next to the category name. You can add as many items as you wish.
- To change the name of each item, click directly on the item name and start typing.
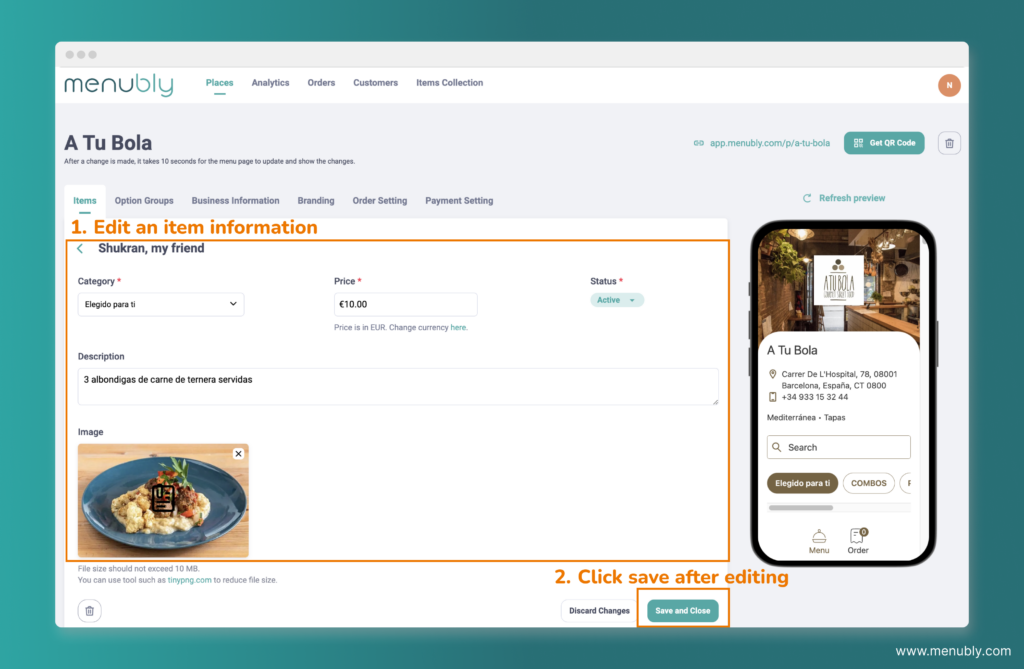
Edit an item information #
- Click on each item to open the item details screen. On this screen, you can edit:
- Item name
- Item category: select the category this item belong to
- Item price: if you wish to change the currency for the price, you can change it on Business Information tab
- Item description: additional information about the item
- Status:
- Active: The item will appear on the menu page for your customers to order from.
- Sold out: Item will be marked as “Sold out” on menu page
- Hidden: Item will be hidden from the menu page. This is useful for seasonal items that aren’t always available but you want to keep it on the list in case you want to enable it back later.
- Image: Add a large image for your item
- After you finish editing, click “Save and Close“
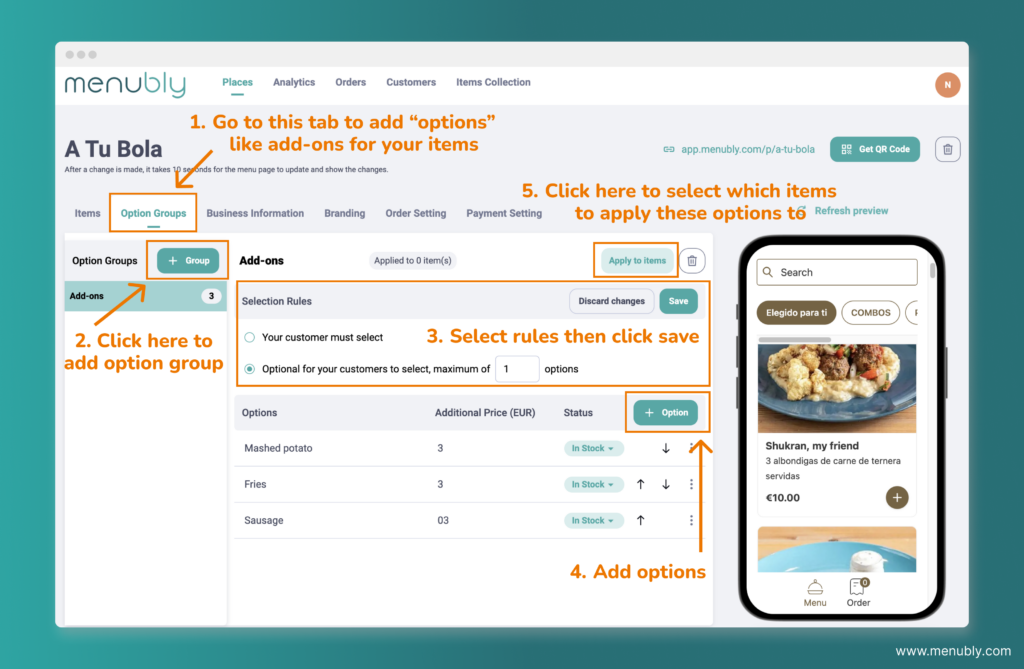
Add new options group #
Option group is collection of options that you can link to your items. Customers can personalize their orders based on the options provided. A few examples of option group are:
- For beefsteak restaurant:
- Option group = side dish
- In this option group, the options include: mashed potatoes, fries, sausage, etc.
- For bubble tea shop
- Options group = toppings
- In this option group, the options include: black pearls, white pearls, grass jelly, etc.
- Go to the “Option Groups” Tab
- Click “+ Group” to add new option group
- Select the rules. You can either make it optional or mandatory for your customers.
- Click ” + Option” to start adding the options
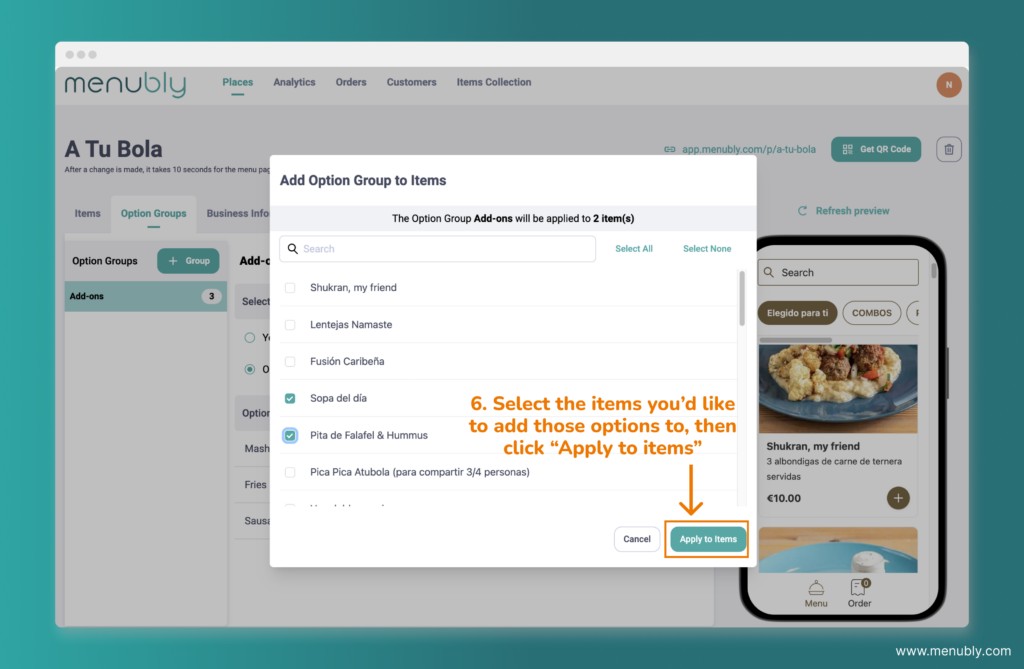
- Click “Apply to items” to select which items to apply these options to
- Select the item you would like to add those options to, then click “Apply to items” to save the changes
Edit business information #
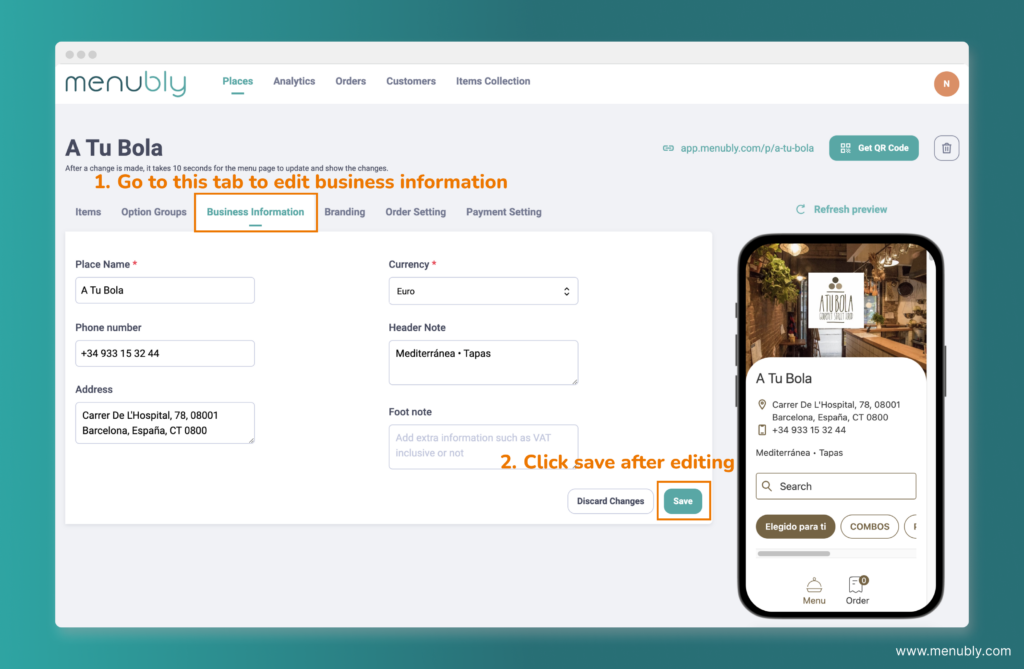
1. Go to the Business Information tab. In here, you can edit:
- Place name: your restaurant’s name
- Phone number: your restaurant’s phone number
- Address: your restaurant’s address. This will appear underneath your Place name
- Currency: USD, Euro, etc.
- Header Note: a few informative sentences about your restaurant that will be displayed above the menu. (for example: we offer free delivery)
- Foot note: This note will be displayed at the very bottom of the page, this is good for notes that require less attention from your customers (for example: if the price on your menu is VAT inclusive or not)
2. Click “Save” after you finish editing
Edit the look & feel of the menu to match your brand #
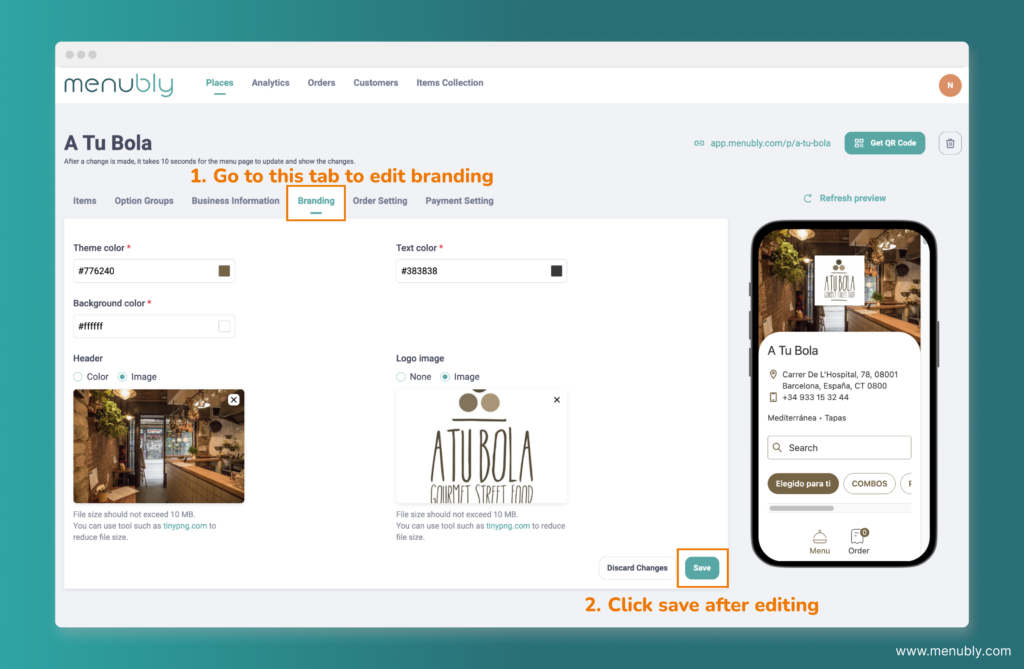
- Go to the Branding tab. In here, you can edit the look & feel of the menu including:
- Theme color
- Background color
- Text color
- Header image: a large image that will appear on top of your menu, like a cover photo.
- Logo image: your restaurant’s logo
- Click “Save” after you finish editing
Share your Menu URL or use the QR Code #
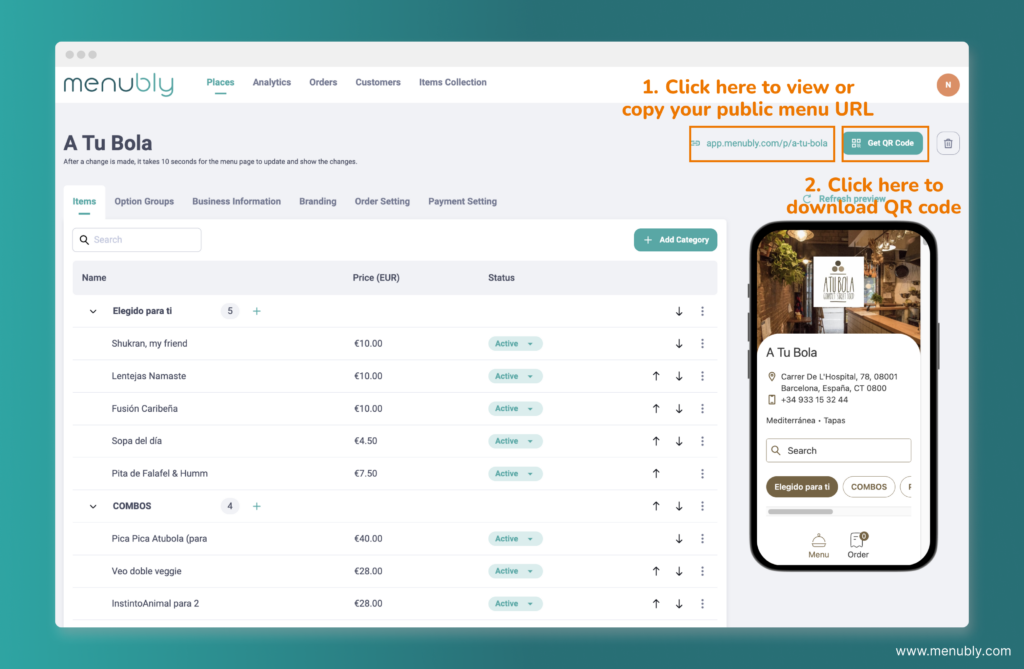
- Share public menu URL:
- On the top right corner, you will see a public URL for your menu.
- Click on that link to see how your menu appears to your customers.
- You can share your public Menu URL on social media or with your customers directly.
- Use the QR Code:
- You will also see the “Get QR Code” button next to the URL, click on it to download the QR Code, then print it and place it in your restaurant so your customers can scan it
Still stuck? We can help. Contact us via live chat or whatsapp us if you need assistance.